Helping guide for devs who would like to set up Grafana and contribute to it (or just explore it) 📊
Grafana is an open source visualisation and analytics tool. Most commonly, it is used for visualising infrastructure data and for application analytics but lots of people are using it in many other areas including home automation 🏠, monitoring of beehives 🐝, for weather, for launching the space rockets 🚀and so on. Basically, any time-series data can be beautifully visualised and better understood with Grafana (learn what time-series data are). If you haven’t had a chance to play with Grafana, as a first step, I would definitely recommend to check out Grafana playground.
Being a junior developer means that, you haven’t had a chance to work with the whole spectrum of different technologies, scripts, tools, products and concepts, yet. And there is a lot of them! So when I started with setting up Grafana, I realised, that I haven’t fully understand all of the steps, as I haven’t used some of the technologies and concepts before.
I’ve started to look for a starting guide for junior developers, who would like to contribute to Grafana, that would explain these steps in more details to me. But I haven’t. So I decided, to write one for everybody, that wants to contribute to this amazing project and want to learn a little but more about each step.
But remember, always make sure that you review README as it is source of most up to date information. I am using a mac, therefore I will describe setting up Grafana on the OS X.
1. Dependencies
As a first step, you need to make sure, that you have installed all necessary dependencies. If you are missing any dependency, I recommend using Homebrew ☕️for installation. It is an amazing package manager for OS X that makes installing of a lot of different programs and packages much easier. It usually takes literally less than a minute to install almost anything, while installing the same manually would in most cases take 10 minutes or more.
Necessary dependencies:
- Go( see go.mod for minimum required version)
- Node.js (Long Term Support)
- Yarn (
npm install -g yarn) - Git
2. How to download Grafana
Secondly, we are going to be using Go to download and install Grafana. You need to start with opening your bash profile and adding export GOPATH=$HOME/go/ there. This will set up GOPATH directory on your system (more info here). So how to do this?
- Open terminal and list all files in the home directory
ls -a2. You should be able to see your bash profile (.bash_profile). If you don’t see it, you can easily create profile with touch .bash_profile command.
Now, when you see it, then you can easily open it in edit mode.
open -e .bash_profile3. Add export GOPATH=$HOME/go to your bash profile (feel free to ignore the other stuff than export GOPATH=$HOME/go there).

4. Save and exit your editor.
5. Reload your bash profile by running:
source ~/.bash_profileNow, we are ready to install Grafana by running the go get command in terminal.
go get github.com/grafana/grafanaBy using this command, Grafana will be downloaded and installed to $GOPATH/src. You can then get to the Grafana directory by running following command from your home directory.
cd $GOPATH/src/github.com/grafana/grafanaAfter that, just open directory with Grafana codebase in your code editor.
3. Running the code
Backend
To run the backend, we will use make run command. Personally, I haven't used make commands before. Actually, to be completely honest, I've never heard about them and I wasn't sure, what they are and why are we using them. I also think it is very important to understand commands, that we are using. Therefore before running it, I'll try to quickly describe what they are, what is Makefile and why is Grafana using it.
Makefile is very useful because it allows to rerun only what is needed when you make a change. Grafana is a large project and rebuilding can take some serious time because there are many files to be compiled and linked. So when you, as a developer, would make a little change it would be annoying having to wait to rebuild everything each time.
A Makefile is a solution for this. It stores a list of input files, output files and commands needed to produce the output based on given input. When you make a change to the project the command make will check the date of the input files with the date of the corresponding output files and if the input files has been changed it will recreate the corresponding output by running the command. Actually, most open source projects use makefiles. You can learn even more here.
So in this specific case, make run compiles Go and starts the web server. In case of any changes, it recompiles and restarts the server.
make run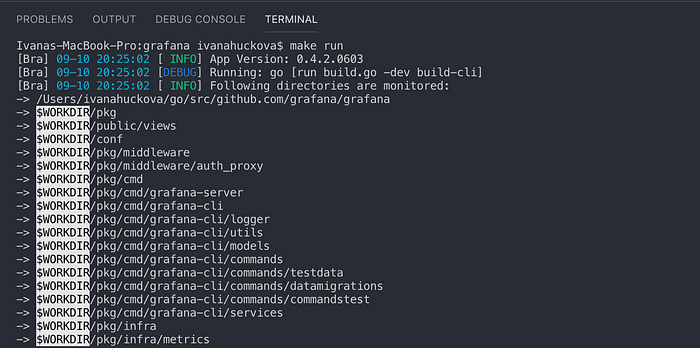
Frontend
Frontend part is pretty straight forward. You need to install front-end dependencies first, and then run yarn start.
yarn install --pure-lockfileyarn start
Grafana is going to be served on http://localhost:3000. You will see the login page. Default credentials are:
username: admin
password: admin
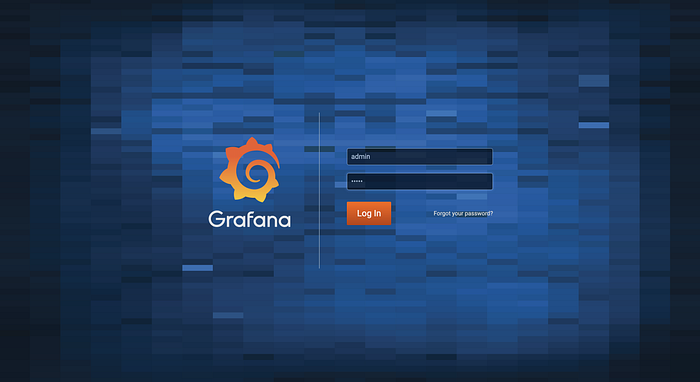
When you log in for the first time you will be asked to change your password.
Tests
Run tests using yarn jest
yarn jest4. Adding datasources
Luckily for all developers and contributors, you can easily add datasources and run corresponding databases. You can find the documentation here, but I will still walk you thought it and add some additional information.
As a first step, you need to change your directory to devenv.
cd devenvIn devenv, you need to run bash command ./setup.sh. This means, that running ./setup.sh will execute this script (any executable bash script can be run by preceding it with ./) and it will setup a couple of datasources and dashboards in your Grafana. Datasources will be named gdev-<type> and dashboard folder will be named gdev dashboards. After running this command in terminal, don't forget to restart grafana server (backend). You should then be able to see the changes.
./setup.sh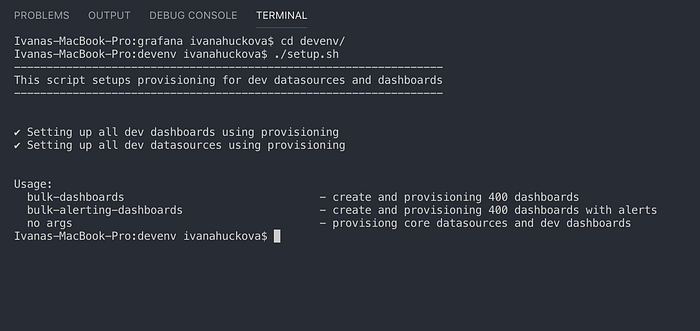
If you want to run databases for those datasources, you are going to need Docker. You can install Docker Hub (containing Docker Engine, Docker CLI client, Docker Compose, Docker Machine, and Kitematic) via its official site. Installation is pretty straight forward. As soon as you are up and running with Docker, you can follow with next steps.
Why do you need Docker? Docker is a tool designed to make it easier to create, deploy, and run applications by using containers. Containers allow a developer to package up an application with all of the parts it needs, such as libraries and other dependencies, and ship it all out as one package. By doing so, thanks to the container, the developer can rest assured that the application will run on any other machine. However, if your Docker application includes more than one container — for example couple of different databases running in separate containers — building, running, and connecting the containers from separate Dockerfiles can be very time-consuming. Docker Compose solves this problem by allowing you to use a YAML file to define multi-container apps. You can configure as many containers as you want, how they should be built and connected, and where data should be stored. When the YAML file is complete, you can run a single command to build, run, and configure all of the containers.

Firstly, get back to grafana directory from devenv.
cd ..Secondly, you are going to run make command.
make devenv sources=influxdb,prometheus_mac,lokiAs you can see in the Makefile, this command will create a docker compose file with specified databases configured and ready to run. Just run the command, restart Grafana server, and you should see the added datasources.
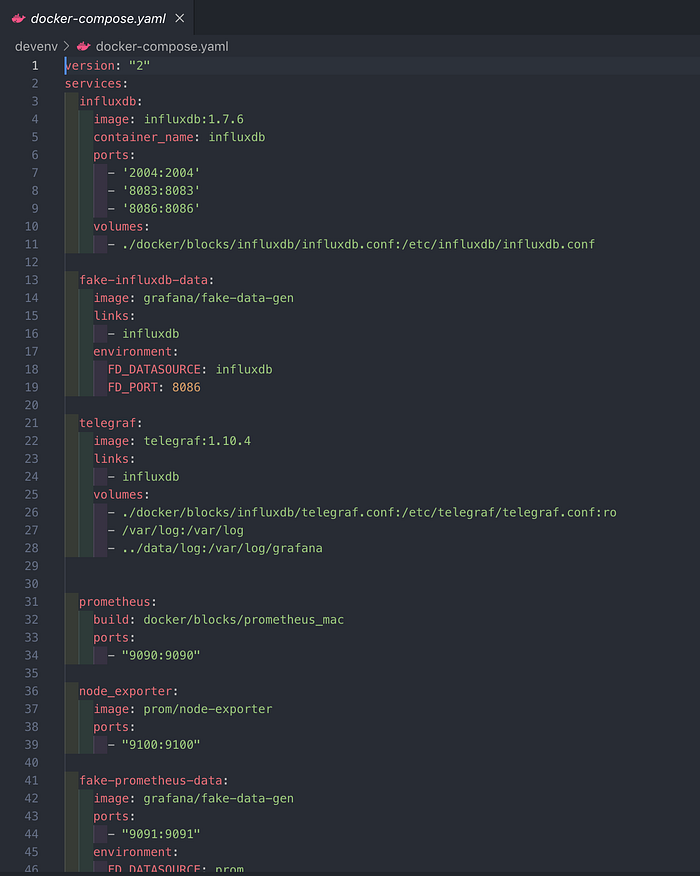
You can find the list of all available databases in grafana/devenv/docker/blocks. Make sure, that if the database has a version with _mac and you are on mac, you’ll choose that one.

5. Learning how to contribute
Grafana has a contribution guide, that you can find here.
Couple things that I would like to point out:
- Make sure to follow frontend style guide
- Check out beginner-friendly and help-wanted tags for easier issues
